Hello! If you still do not know how to weave baubles from threads or have never tried to do it, then the easiest way is to start with the simplest Baubles of the Classics. Here's what she looks like:

This bauble can be woven from any number of threads, since there is no scheme for it.
I will take two threads of three different colors. The length of each thread is 80-90 cm (for wrist circumference 13-14 cm with regard to the strings).
To begin with, fasten the threads (the most primitive options are to stick them to the table with tape or pin all the threads in a knot, pin to jeans with a pin).

Now take the last thread on the left and tie a knot on the next one with it.

Return this thread to the left and tie another exactly the same knot.

Yes, in baubles, each node actually consists of two. (Read more about this in the Basic Nodes lesson). So, you got the first knot. Next knit the knot on the next thread (blue).


And so on, until you reach the edge.

Now take that thread that has become the extreme left, and work with it. Tie all the other threads until you reach the edge.

Scourge in the same way further until you get a bauble of the desired length.
Braid the remaining tails in pigtails and secure them at the ends with knots, trim off the excess. Don't be afraid to experiment with colors! And remember: the longer the desired length of the bauble, the longer the threads should be.
ZY If you get better knots in the other direction, then you can weave a fescue from right to left. 🙂
Do you have any questions? Perhaps I will answer them in this video:
Pigtail in three rows
- Gently but firmly tie the ribbons together, making a small loop.
- We fold each free end so that it resembles the ears of a hare, we pass one into the other, and then we tighten.
- Repeat the previous step.
- Tie a strong knot.
Such decoration can be attached to clothes, to a hair band or to decorate any objects.
Round bauble
In this method, you should select inconspicuous colors, and the length of each band should not exceed 1 meter.
- We fold one in half, and the second so that the tip is up to 15 cm.
- It is necessary to transfer it one by one.
- Tighten the knot, connecting a beautiful bow.
The result will be a drawing resembling two chess rows.
For another version of weaving, take multicolored ribbons in 3 meters.
Spread them on a flat surface crosswise, then fix in the middle with a pin. Get a cross of 4 tails.
We shift each other in such a way so that we get a two-color square, which later must be tied together by a knot.
Then we repeat the previous stage until the bracelet of the desired length is obtained.
While tying, gently stretch half of the ties to the bottom on the opposite side and tie tightly with a bow or regular knot.
Spiral bauble
We take two ribbons 1 m long in contrasting colors.
- Bend the ends of both strips to 15 cm.
- The angle between them should be slightly less than 90 degrees.
- Fold the dark under the light in the form of a knot, then wrap up to a full circle so that the end protrudes.
- We skip the small dark loop through the large light loop, and then pull the short end of the dark lace until a knot appears.
- Pass through what remains of the loop.
- Repeat all the steps described until the bauble is the right length.
Try not to bend the edges during weaving, then you get a flat square.
Square bridal 4 ribbon
It will take four satin ribbons of any color, up to 2 cm wide and 3-4 m long.
Tie them together, leaving 10 cm for stock.
Fold the first end into the loop, then cover it from right to left with the second folded in the same way. Then we take the third band and overlap the previous one. The latter bends down and slips from left to right into the ear of the very first ribbon.
We straighten and finish all the ends, forming a volumetric square.
Repeat these steps until the length is complete, and then fix.
Weaving bracelet of satin ribbons with the addition of beads
Take the tape of the required length and move about 15 cm from the edge. Exactly in the middle, thread the needle with the silicone thread so that it enters from the front, and comes out after about 2 or 3 cm from the same side. We put a needle in a bead and make a stitch. After this procedure is repeated.
- Stitch length should be the same.
- At the end, the thread is cut, and its ends are tied several times.
- The ends can be hidden inside the last bead, previously singed.
If you take three or four ribbons of different widths, put them one on another, you get a more voluminous bauble.
Bracelet with laces, chains, beads
You will need beautiful little ribbons, chains, beads and clasps.
- Stringing beads on a thread.
- We take the tape, different in thickness of the chain sew to fastener.
- We divide everything into three parts, weave a pigtail.
- At the end we sew the second part of the fastener.
When weaving, do not tighten the braid too much, it will give the texture to the product.
Tips for beginners
- Choosing the color of the bauble, consider its designation.
- Leave the loops slightly free to make the product look symmetrical, and the design is smooth and neat.
- The band must be the same length.
- So that the product does not slip, and the loops are not opened, you can fasten them with a pin or needle.
- You can tie the finished product on a normal knot, leaving the ends of the ribbons hanging down.
Any outfit can be complemented by a handmade bracelet, spending a little time on it.
Master Class
- Fold one and second baubles in half, leaving 10 cm tips for ties.
- Bind one ribbon over another, as shown in the picture.
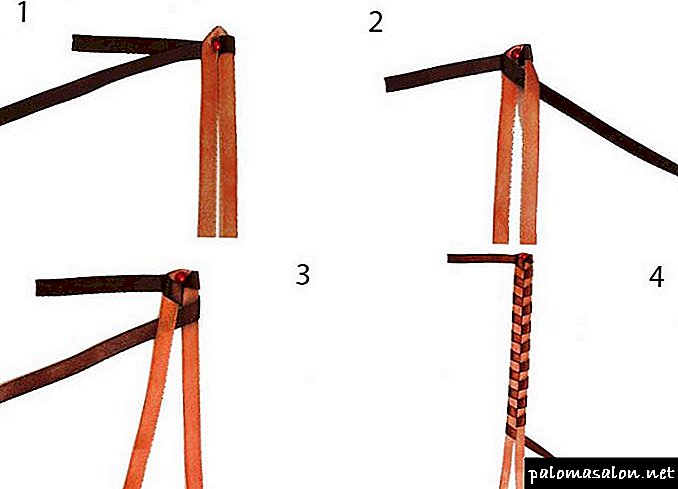
- Spun a bauble of the desired length from 13 to 18 cm.
- Secure the bauble by joining all 3 pieces into a knot.

Simple satin ribbon bauble is ready!
Simple bauble from two tapes for beginners
To weave such a bracelet, you will need 2 ribbons of different colors. You can choose any colors to your taste, but they should be harmoniously combined with each other. One of the most versatile options is yellow, which can be combined with red, blue, green hues.
 A great example of a color combination.
Having prepared 2 pieces, each about 1 meter long, proceed to weaving:
1) Bend the end of the first ribbon, wrap around the second loop and tie the knot. The first segment forms a sliding eyelet, which can be tightened and stretched.
 We begin the process of weaving
2) Fold the second ribbon into the loop and pass it through the first loop, tightening the last one.
 We fold the ribbon and pass through the loop
3) After this, we again fold the loop of the ribbon of the first color and pass it through the second, tighten it.
 The process of weaving baubles from two ribbons
4) We continue weaving in the same way, alternately threading one loop into another.
 We continue weaving by the same pattern to a certain length.
5) We fly to the desired length and tie a knot at the end. Fenichka is ready!
 So, our bauble is ready
Weaving baubles from two ribbons
ot-video / ot-video
Weave three-color bracelet from ribbons
The weaving of baubles from three ribbons according to the technique is similar to the weaving of two parts, but the appearance of the bracelet is different. The accessory will be more interesting in color combinations, and the pattern on the front side and on the wrong side will be different.
 Three ribbon weave
Let us analyze in more detail how to weave baubles from 3 ribbons:
1) Fix the tape on the surface in any convenient way (for example, with scotch tape or a pin).
2) We put 1 segment to the right, 2 to the left and then weave these two ribbons together.
3) We fold the loop of the first ribbon and wrap it in two others, fasten it.
4) Fold the loop out of a pair of pieces, pass it through the loop of the first tape and tighten.
5) Then weaving is repeated in the same way, similarly to a two-color bauble.
Weave a bauble of three ribbons
ot-video / ot-video
How to weave a square bauble from ribbons
The square shape of the harness is an interesting feature of 4-ribbon baubles that looks very stylish and unusual. However, it can be worn and twisted, then the bracelet takes the form of a volumetric spiral.
 Bulk bauble will look great on your hand
During twisting, it is important that the bauble does not stretch out or deform, otherwise it may lose its attractive appearance. For work you will need 4 pieces of tape with a length of 2 meters or a bit more.
 For the work we need tapes
You can take segments twice as long, then they need two. Let us examine in more detail the weaving of this baubles from 4 ribbons:
1. Work should begin with the fastening of the future bracelet. We tie all the tapes in a knot, leaving the ends to be tied 15 centimeters each.
 The process of weaving a square bracelet
2. Fold the ribbons so that they are located on the 4th sides - up, down, right, left. The front and seamy side of the tape during weaving is not necessary to disassemble.
3. The first segment is lowered from top to bottom so that a loop is formed.
4. The second ribbon on the right is transferred to the left, overlapping the first one.
5. Bend the third ribbon upwards, overlapping the previous one.
 We drag the bracelet to the desired length, and fasten it to the wrist
6. We transfer the last segment from left to right and draw it into the loop of the first ribbon.
7. Tighten weaving and straighten ribbons. It turns out a flat square.
8. We fly to the desired length, repeating 3 - 7 points.
 So, our volume bracelet is ready.
The volume bracelet is ready! It must be remembered that square baubles can stretch out with careless handling. You can strengthen them by pulling a tough string or fishing line into the middle.
We learn to weave square bracelets of satin ribbons
ot-video / ot-video
How to weave a round bauble from ribbons
Unlike the previous bracelets, the dense round braid is resistant to stretching and does not lose its shape for a long time. It uses Chinese knots called "lotus", which can be tightened quite tightly.
 A round ribbon bauble woven with your own hand will be an excellent gift.
You will need 2 ribbons 2.5 meters long or four shorter (about 1.5 m.). Let's analyze how to make a bauble from round ribbons, step by step:
1) If you have 2 ribbons, you need to fold them crosswise and fasten with a pin, if 4, tie a knot 10 cm from the edge and also fasten with a pin.
 The beginning of weaving a bracelet of two years
2) The first ribbon remains lying horizontally, the second one is bent in the form of an arch over it.
 We continue weaving in the same spirit
3) Expand the left end of the first tape and place it parallel to the right over the second tape.
 Unfold the ribbons and stack them in parallel.
4) The right end of the first ribbon is lifted up and laid on the ends of the second.
 We put the tape on top
5) Again we work with the second ribbon. End, which lies on top, bend to the left and skip above and below the first ribbon.
 We are working on the second ribbon, skipping it on the first
6) Tighten the knot, straightening the elements of the square.
 We tighten knot, straightening tapes
7) After that, tighten the knot again, more tightly.
 We tighten the knot a little stronger
Repeat the scheme of tying knots the necessary number of times to weave a bracelet of the desired length.
 Repeat steps, weaving a cord of the desired length.
The accessory woven in this way is very strong, so it can become not only a bauble, but also a key ring, an item of clothing decor or a rim for hair.
Master class: round bauble of four ribbons
ot-video / ot-video
2, 3, 4 satin ribbons and some free time: the simplest technology of weaving baubles in the form of a bracelet
Braided baubles are made from a variety of materials - leather, floss, strung on a thread of beads or beads, satin. The main thing that the materials were in the form of tapes. It is easiest to master the basics of needlework with the help of a satin ribbon - it is rather plastic and at the same time has elasticity to keep the shape.

You can wear a beautiful bauble on your hand in the form of a bracelet, bookmarks in a textbook, use it as a key fob to decorate a handbag, keys or phone. Or just give a friend as a sign of attention and location.
It is necessary to start mastering by studying the weaving pattern of ribbons, which use the most minimal amount. In this kind of needlework there are only two of them - you can take both different colors and the same.
Weaving baubles from two ribbons: a step-by-step instruction for beginners
Step-by-step instructions for creating this original accessory are:
- prepare 2 ribbons of length not less than 100 cm, or 1 m. For beginners mastering the skill, the most successful choice will be strips 1 cm wide. In our example, these are 2 tapes - one green, the second is bright yellow,
- both stripes are folded and tied in a knot. It should be located as close as possible to the edge,
- then with one hand grab a strip of green and wrap the loop,
- with the other hand, wrap the same loop from a bright yellow strip,

- the loop of bright yellow color should be passed through the loop of green color,
- pull the end of the green ribbon and tighten the loop,
- we form the next loop of green ribbon and pass through it in bright yellow,

- now pull the end of the bright yellow ribbon and tighten it,
- We continue the process of forming the accessory until it reaches the length we need.

So you learned weaving ribbons baubles. It's time to move on to more complex designs.
Square ribbon bauble
If you want to look even more original, then it's time to start the development of square baubles. To do this, we will again prepare 2 strips of satin ribbon 150 cm long. Afterwards you will be able to determine what length of ribbon you will need to create an accessory. In the meantime, proceed:
- from the end of each ribbon we make a loop and overlay each other,

- we wrap another loop around the edge,


- pull one loop through the second and tighten,


- from the tape, which was tightened, a loop is formed and pulling is carried out through the already existing one,
 Do everything according to the instructions and the result will please you
- alternately repeat the steps until the end of the process.
The resulting accessories can be decorated additionally. As jewelry usually beads, flowers, also made by hand or other interesting details.
Tip: Until you have learned how to knit knots, always use pins or ordinary sewing needles — to prevent one part from slipping relative to another. Secure all key points without exception.
There are a great many ways of weaving - it’s not for nothing that this is one of the most ancient types of needlework. But if you know the basics, then mastering the other ways for you is not difficult. After all, the main thing is accuracy and compliance with the sequence of actions.
How to weave the simplest bauble for beginners
- It is necessary to prepare two satin ribbons 3-5 mm wide and from 50 cm to 1 meter long. Ribbons can be either one color or multi-colored. Beginners better to use segments of different colors. Take, for example, green and yellow colors.


Holding the green ribbon with one hand, with the other hand take the yellow one, and fold it into the same loop.

The yellow loop must be threaded into the green one.

The green loop needs to be tightened.

Next, collect a new green loop, and pass through the green loop in the yellow.

The yellow loop must be tightened.

Then again you need to fold the yellow loop, thread it into the green, and tighten.

Everything, further operations are repeated until the satin pieces run out or the bauble is woven.

Tips for weaving baubles
- According to the ideas of hippies and some other subcultures, a certain combination of colors of baubles has a certain meaning. Therefore, the choice of color should be treated responsibly. Otherwise it may happen that the braided bracelet presented by the girl to her beloved boy will “testify” that the young man belongs to the representatives of non-traditional sexual orientation.
- During weaving when tightening the knots do not need to use excessive force. Nodules should be slightly free - so they will have a neat and identical look, and be located strictly symmetrical. Only in this case, the braided bracelet will look beautiful and attractive.
- If from the first time the bracelet turns out to be unpresentable and unsuccessful - that's okay, you just need to weave and weave it again.
- While working you need to be careful - then the work will go on and everything will be right the first time.
- If the ribbons slip out during operation and the loops fall apart, they can be fastened with a pin. Subsequently, with experience, everything will turn out on weight, but the first time in order to save nerves, you will have to fix the ends of the loop with a pin.
- At the end of the manufacture of the bracelet tips can be tied into a knot, and you can leave it hanging down.
You may also be interested in this kind of creativity, as weaving macrame. After reviewing the step-by-step video tutorials and diagrams with photos, you quickly learn this technique.
How to weave a spiral bauble
For this method of weaving will need two satin ribbons with a length of about a meter. Consider, for example, weaving in this way with the help of black and silver ribbons.
- First you need to bend the end of each tape by 10-15 cm, and fold the ends on the rest of the tape.

Both tapes are placed at an angle of slightly less than 90 degrees to each other.

Fold the black ribbon under the silver-like knot.

We turn the ribbon to the full circle so that the tip of the black ribbon sticks out.

Through the small black loop you need to skip the big silver loop.

Now you need to pull the short tip of the black loop until a loose knot appears.

Next, make a new loop, and skip the rest of it through the rest of the loop.

Everything, now it is necessary to tighten the end of one loop, and at the same time fix another loop. No need to make excessive efforts, otherwise the bracelet will not be very beautiful.

Now you can see the resulting square. We must try to keep the edges smooth. Along the way, you can adjust the edges, tightening the loops.

Next, it will remain to repeat all the steps until you get a bauble of the desired length.

See also the master classes, how to make crafts from ribbons do it yourself for beginners.
Bead Tips for Beginners
Understanding how to weave beginner ribbon baubles is quite simple.
 Having mastered weaving, you can create original bracelets
Under the guidance of adults, this handicraft can be quickly mastered by a child. However, there are several subtleties that can warn against mistakes and quickly increase the level of skill:
- · It is always necessary to carefully monitor the tightening of knots and loops. Of course, at the very beginning of mastering technology, the ideal result is rarely obtained. Yet it will be useful to master the principle as quickly as possible. To do this, the ends of the ribbons at different stages of work must be the same length.
 Tips for beginners: take ribbons of the same length
- Also, it is recommended not to overload the nodules and follow the symmetry.
- · It will be useful for beginners to fasten ribbons with pins while working, and at the beginning of weaving to tie up the ends with a knot.
 Our little helpers when weaving baubles
- This prevents unnecessary slippage of the ribbon and looping. Weaving bracelets on weight without fastening is also possible, but it requires experience and skill.
- · A large role in how the finished product will look like is played by color combinations.
 Weaving baubles does not require special experience, the main thing is to learn how to combine colors
- Therefore, anyone who wants to master a hobby at a high level, it is useful to learn how to combine shades with each other correctly. In addition, in some subcultures, the colors of braided bracelets have their meaning and can be included in the decoration for a specific purpose. These color codes are also recommended to be studied and kept in mind.
 Baubles - decoration that came to us from antiquity
Weaving baubles is a fascinating activity that will suit even those who have very little experience in needlework, the main thing is to have the desire and some free time.
 Weaving baubles is a great hobby that even a beginner can master